How to Build a Sablier V1 Dapp

This blog post was written by Nichanan Kesonpat.
Sablier is a protocol for real-time finance. The protocol allows for continuous payments — where users essentially stream money to each other as opposed to paying in one lump sum transaction. This opens up many possibilities in payroll transactions, micro-consultation services, and other engagements where time is money.
A payer’s deposit is sent to the Sablier smart contract which handles the “streaming”, or incremental allocation of the deposited funds over a time period, specified by the creator of the payment stream. Instead of having to wait for bi-weekly or monthly payroll, the recipient can withdraw from the stream at any time — every day becomes payday.
Payments can be made in any ERC-20 token, and the sender can cancel the stream any time should the engagement not work out. If a stream is cancelled before the designated stop time, the already allocated funds get forwarded to the recipient while the remaining deposit is returned to the sender.
Some potential use cases
- 💼 Micro-consultation services. Get paid for 10 minutes of your time to answer quick questions from one-time clients
- 👩🏻💻 Beta testers are streamed DAI for giving live feedback on upcoming product releases
- 🛠 Experienced engineers and security experts streamed DAI for giving private workshops and webinars
- 📖 Pay-per-minute-stream for your attendance in online classes instead of paying a lump sum for access at the beginning
- 🎨 Virtual world architects streamed MANA for their time designing in-world estates for clients
- 🙎🏼♀️ Stream social tokens for 1–1 time with influencers
…to name a few. See this thread for an extended list
We are still at the tip of the iceberg when it comes to streaming money, but Sablier serves as a tool for developers to start getting creative with this exciting new way in which we transact with one another.
Goals
In this tutorial, we’ll walk through how you can build a React app that lets users create and withdraw from payment streams running on Sablier protocol. You’ll learn how to:
- Scaffold a project folder with
create eth-appand the Sablier template - Connect your app to the blockchain using React hooks and web3-react
- Create a Sablier-powered payment stream
- Retrieve stream information from the blockchain with The Graph
- Withdraw from or cancel a payment stream
Requirements
- Since
create eth-apprelies on Yarn Workspaces, you’ll need yarn on your machine. You can follow the installation instructions on the official website to set it up if you don’t already have it. - You’ll need to be on Node v8.10.0 or v10.16.0 or later in order to avoid an incompatible Node version error upon installation. You can switch between Node versions in your project by running
nvm use, for example:
nvm use 10.16.0Check that you’re on the desired Node version using nvm version. Good to go?
1. Scaffold the project with create eth-app
create eth-app is a neat command-line tool that bootstraps your #DeFi application with pre-filled contract ABIs, addresses and subgraphs. Run the create eth-appcommand to create a directory with out-of-the-box project scaffolding.
yarn create eth-app --template sablierThis gives you the following:
my-app
├── README.md
├── package.json
├── packages
│   ├── contracts
│   │   ├── README.md
│   │   ├── package.json
│   │   └── src
│   │       ├── abis
│   │       │   ├── erc20.json
│   │       │   ├── payroll.json
│   │       │   └── sablier.json
│   │       ├── abis.js
│   │       ├── addresses.js
│   │       └── index.js
│   └── react-app
│       ├── README.md
│       ├── package.json
│       ├── public
│       │   ├── favicon.ico
│       │   ├── index.html
│       │   ├── logo192.png
│       │   ├── logo512.png
│       │   ├── manifest.json
│       │   └── robots.txt
│       └── src
│           ├── App.css
│           ├── App.js
│           ├── App.test.js
│           ├── ethereumLogo.png
│           ├── index.css
│           ├── index.js
│           └── setupTests.js
└── yarn.lock
We’ll be working mostly in the react-app directory that comes with the template. As you can see, the ABIs and addresses for Sablier are already included. These will become useful later when we want to interact with the Sablier smart contract.
Navigate to the react-app directory and double-check that you can spin up a local development server
cd packages/react-app && yarn startYou should see the following on localhost:3000
If we take a look at what’s going on in App.jswe can see that there is a basic example of how to connect and pull data from the Sablier subgraph. This will be useful for later when we want to get information about our payment streams.
2. Add web3 functionality with web3-react
For this tutorial, we will be using the web3-react package to communicate with the Ethereum blockchain. web3-react ensures that certain key pieces of data (the user’s account, what network they’re on etc.) are kept up-to-date. It uses Context to efficiently store this data and inject it wherever you need it in your application using the useWeb3React hook.
The features we’ll need comes with the web3-react’s coremodule. Since we’ll be using a browser extension (Metamask) to communicate with the blockchain in this tutorial, we’ll also need injected-connector . Add these dependencies with
yarn add @web3-react/core @web3-react/injected-connectorIn index.js , import the Web3ReactProvider and make it a parent of the existing <ApolloProvider> and <App /> . The getLibrary prop is responsible for instantiating a web3 library object from the provider.
// index.js
import { Web3ReactProvider } from '@web3-react/core'
function getLibrary(provider) {
  const library = new ethers.providers.Web3Provider(provider)
  library.pollingInterval = 10000
  return library
}
....
ReactDOM.render(
  <Web3ReactProvider getLibrary={getLibrary}>
     <ApolloProvider client={client}>
       <App />
     </ApolloProvider>
  </Web3ReactProvider>,
  document.getElementById("root"),
);
To use the useWeb3Reacthook, sign transactions, and use the injected web3 provider, we’ll create three new files, hooks.js,signer.jsand connectors.js. You can find the barebones code for these in this gist
import { InjectedConnector } from "@web3-react/injected-connector";

export const injected = new InjectedConnector({
  supportedChainIds: [1, 3, 4, 5, 42]
});
import { useState, useEffect } from "react";
import { useWeb3React } from "@web3-react/core";

import { injected } from "./connectors";

export function useEagerConnect() {
  const { activate, active } = useWeb3React();

  const [tried, setTried] = useState(false);

  useEffect(() => {
    injected.isAuthorized().then(isAuthorized => {
      if (isAuthorized) {
        activate(injected, undefined, true).catch(() => {
          setTried(true);
        });
      } else {
        setTried(true);
      }
    });
  }, [activate]); // intentionally only running on mount (make sure it's only mounted once :))

  // if the connection worked, wait until we get confirmation of that to flip the flag
  useEffect(() => {
    if (!tried && active) {
      setTried(true);
    }
  }, [tried, active]);

  return tried;
}

export function useInactiveListener(suppress = false) {
  const { active, error, activate } = useWeb3React();

  useEffect(() => {
    const { ethereum } = window;
    if (ethereum && !active && !error && !suppress) {
      const handleNetworkChanged = networkId => {
        console.log("networkChanged", networkId);
        activate(injected);
      };
      const handleAccountsChanged = accounts => {
        console.log("accountsChanged", accounts);
        if (accounts.length > 0) {
          activate(injected);
        }
      };

      ethereum.on("networkChanged", handleNetworkChanged);
      ethereum.on("accountsChanged", handleAccountsChanged);

      return () => {
        ethereum.removeListener("networkChanged", handleNetworkChanged);
        ethereum.removeListener("accountsChanged", handleAccountsChanged);
      };
    }

    return () => {};
  }, [active, error, suppress, activate]);
}
import React from "react";
import ReactDOM from "react-dom";
import ApolloClient from "apollo-boost";
import { ApolloProvider } from "@apollo/react-hooks";
import { ethers } from "ethers";
import { Web3ReactProvider } from '@web3-react/core';
import "./index.css";
import App from "./App";
function getLibrary(provider) {
const library = new ethers.providers.Web3Provider(provider)
library.pollingInterval = 10000
return library
}
// This is the official Sablier subgraph. You can replace it with your own, if you need to.
// See all subgraphs: https://thegraph.com/explorer/
const client = new ApolloClient({
uri: "https://api.thegraph.com/subgraphs/name/sablierhq/sablier",
});
ReactDOM.render(
<Web3ReactProvider getLibrary={getLibrary}>
<ApolloProvider client={client}>
<App />
</ApolloProvider>
</Web3ReactProvider>,
document.getElementById("root"),
);import * as ethers from 'ethers'
export default class UncheckedJsonRpcSigner extends ethers.Signer {
constructor(signer) {
super()
ethers.utils.defineReadOnly(this, 'signer', signer)
ethers.utils.defineReadOnly(this, 'provider', signer.provider)
}
getAddress() {
return this.signer.getAddress()
}
sendTransaction(transaction) {
return this.signer.sendUncheckedTransaction(transaction).then(hash => {
return {
hash: hash,
nonce: null,
gasLimit: null,
gasPrice: null,
data: null,
value: null,
chainId: null,
confirmations: 0,
from: null,
wait: confirmations => {
return this.signer.provider.waitForTransaction(hash, confirmations)
}
}
})
}
signMessage(message) {
return this.signer.signMessage(message)
}
}You can read the web3-react documentation to better understand how this works. It may seem like a lot of boilerplate code now, but the useWeb3React hook will become your best friend when the project becomes more complex.
We can use this hook inApp.js to automatically connect to the injected provider and listen to any change in the provider — e.g. if a user switches their account or network on Metamask.
Now the user’s account, the network they’re on, and the current web3 library is accessible via useWeb3React()
const { account, chainId, library } = useWeb3React()3. Create a payment stream
From the official documentation, a Sablier stream has four properties:
- It is enacted between two different Ethereum addresses, a sender and a recipient
- It has a fixed value (dictated by the deposit)
- It has a fixed duration
- It is funded with an ERC-20 token that can’t be changed
These four properties are reflected in Sablier’screateStream method.
function createStream(
     address recipient,
     uint256 deposit,
     address tokenAddress,
     uint256 startTime,
     uint256 stopTime
     )
     returns (uint256) // this is the streamId
In App.jswe can add some basic HTML input and button elements to call on this function from the UI. The datetime picker is from react-datetime-picker and provides an intuitive interface and converts the input automatically to a UNIX timestamp, which is accepted for the time parameters in our contract call.
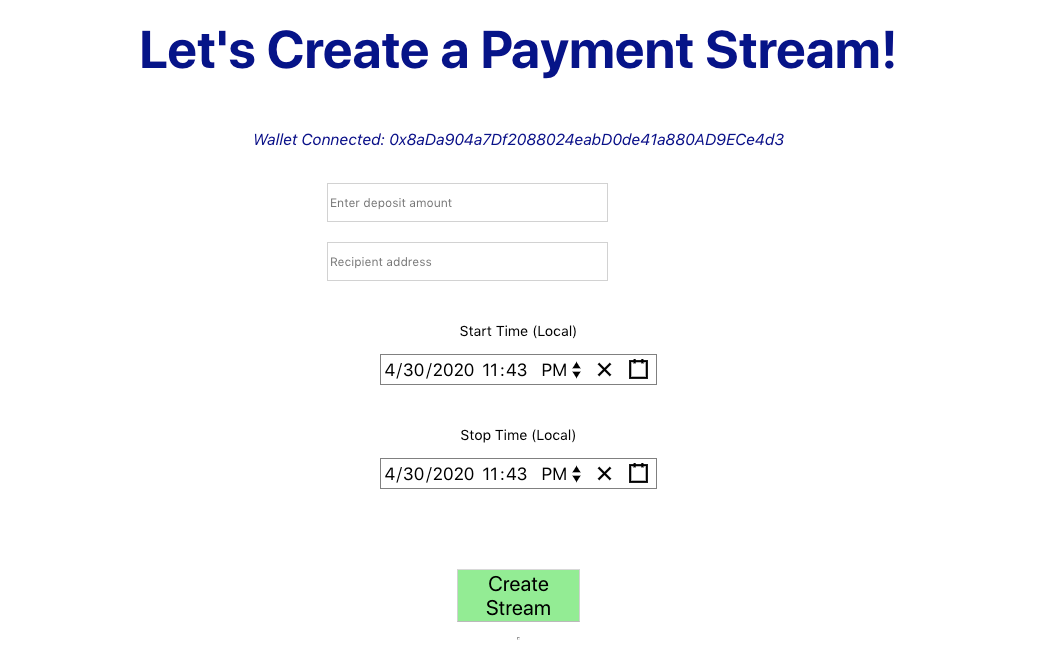
We’re almost ready to start a stream! Link each of these user inputs to their respective states that correspond to each of the parameters we need in our createStreammethod:
- deposit
- recipient
- startTime
- stopTime
- tokenAddress
One of the “gotchas” of Sablier v1 is that the deposit must be a multiple of the difference between the start time and stop time. Otherwise, the transaction reverts.We can get around this by modding the user deposit with the time delta, and then shaving off this remainder from the original deposit. Because the ERC-20 token has 18 decimals, the difference should be negligible in most cases.
// yarn add bignumber.js
// import BigNumber from 'bignumber.js'
// BigNumber.config({ EXPONENTIAL_AT: 30 })   <--- add this after your imports, it will prevent the number from being formatted like "1e+21"

// call this when the user presses the "Create Stream" button
const sablier = new ethers.Contract(addresses[chainId].sablier, abis.sablier, getProviderOrSigner(library, account))

let convertedStartTime = Math.round(startTime.getTime() / 1000)
let convertedStopTime = Math.round(stopTime.getTime() / 1000)
let convertedDeposit = new BigNumber(deposit).multipliedBy(10 ** 18).toFixed(0)
let remainder = new BigNumber(convertedDeposit) % (convertedStopTime - convertedStartTime)
let amountToDeposit = new BigNumber(convertedDeposit).minus(remainder).toString()

const token = new ethers.Contract("0xc3dbf84abb494ce5199d5d4d815b10ec29529ff8", abis.erc20, getProviderOrSigner(library, account));
const approveTx = await token.approve(sablier.address, amountToDeposit);
await approveTx.wait();

const createStreamTx = await sablier.createStream(recipient, amountToDeposit, token.address, convertedStartTime, convertedStopTime);
await createStreamTx.wait();
🕔 Ensure that the start time is some time in the future and that the stop time is after the start time. Otherwise, the transaction will revert. You can use https://www.epochconverter.com/ for easy conversion from epoch to human-readable date and vice versa.
We’re now ready to test the stream creation feature of our app. For this tutorial, we are using Testnet DAI on Rinkeby as the ERC-20 token to stream.
Get yourself some Testnet DAI
Testnet DAI is an ERC-20 token that was made for the purposes of testing decentralized applications. It is available on all the Ethereum test networks (Rinkeby, Kovan, Ropsten etc.). Here is the token’s source code
You can mint yourself some Testnet DAI by going to the contract on their respective Etherscan-s, navigating to Contract and then Write Contract.
- Kovan: https://kovan.etherscan.io/token/0x7d669a64deb8a4a51eea755bb0e19fd39ce25ae9#writeContract
- Rinkeby: https://rinkeby.etherscan.io/address/0xc3dbf84abb494ce5199d5d4d815b10ec29529ff8#writeContract
- Ropsten: https://ropsten.etherscan.io/address/0x2d69ad895797c880abce92437788047ba0eb7ff6#writeContract
- Goerli: https://goerli.etherscan.io/address/0xf2d1f94310823fe26cfa9c9b6fd152834b8e7849#writeContract
- Click Connect to Web3 to sign in with your wallet and get your tokens by calling the mint function.
- Because Testnet DAI adheres to the ERC-20 standard, whose # token decimals is 18, remember to add 18 zeros to the amount you want to mint. For example, if you wanted to mint 9999 TestnetDAI you would put 9999000000000000000000. Double-check that the testnet Etherscan that you’re on matches the one on your Web3 wallet.
Congratulations, you can now start streaming payments from your app! Bear in mind that when the stream starts, the payment does not get sent directly to the recipient’s wallet. The recipient will have to withdraw from the stream, which we’ll see how to do later.
There’s currently no way to see what’s happening inside the stream and no way for the recipient to withdraw from it, so let’s add the ability to do this from our UI.
First, we have to look to the blockchain to get information about the streams that we’ve been involved in. We could just filter through the CreateStream events for the Streams in which we are the sender or recipient. But there is a much simpler and more efficient way thanks to the Sablier subgraph, let’s explore this how we can achieve this.
4. Pulling stream data from The Graph
The Graph is a decentralized protocol for indexing and querying data from blockchains. Until recently, getting chain data required teams to write their own indexing server that they had to run and operate themselves. The Graph uses GraphQL to provide us with a neat API to get the data we need from the blockchain in a single request.
Let’s modify The Graph API source that came with the template in index.js to correspond to the testnet we’re using.
// in index.js - append the testnet name to the ApolloClient uri
const client = new ApolloClient(
   {uri:"https://api.thegraph.com/subgraphs/name/sablierhq/sablier-rinkeby"});
We can now make a query to get the streams that we’re interested in. Let’s query for ones where the account we’re signed in with is either the sender or recipient of a stream. In App.js :
// this returns two arrays, one containing Streams where the user was the sender (senderStreams) and another in which the user was a recipient (recipientStreams)

const MY_STREAMS = gql`
query streams($account: String!) {
  senderStreams:streams(where: {sender: $account}){
    id
    recipient
    deposit
    startTime
    stopTime
  }
  recipientStreams:streams(where: {recipient: $account}) {
    id
    sender
    deposit
    startTime
    stopTime
  }
}
We can get the streams using the same method as included in the template, passing in our account as a variable for the query. This step asks for the streams in which we are either the sender or recipient.
const { loading, error, data } = useQuery(
      MY_STREAMS,
      {variables:  {account},})
Now we have access to the Stream objects that involve the user. We can access it with data.senderStreams and data.recipientStreams , and render these arrays along with the cancel/withdraw buttons for each of them. We can now call the cancel/withdraw functions on the smart contract as we know the streamId s
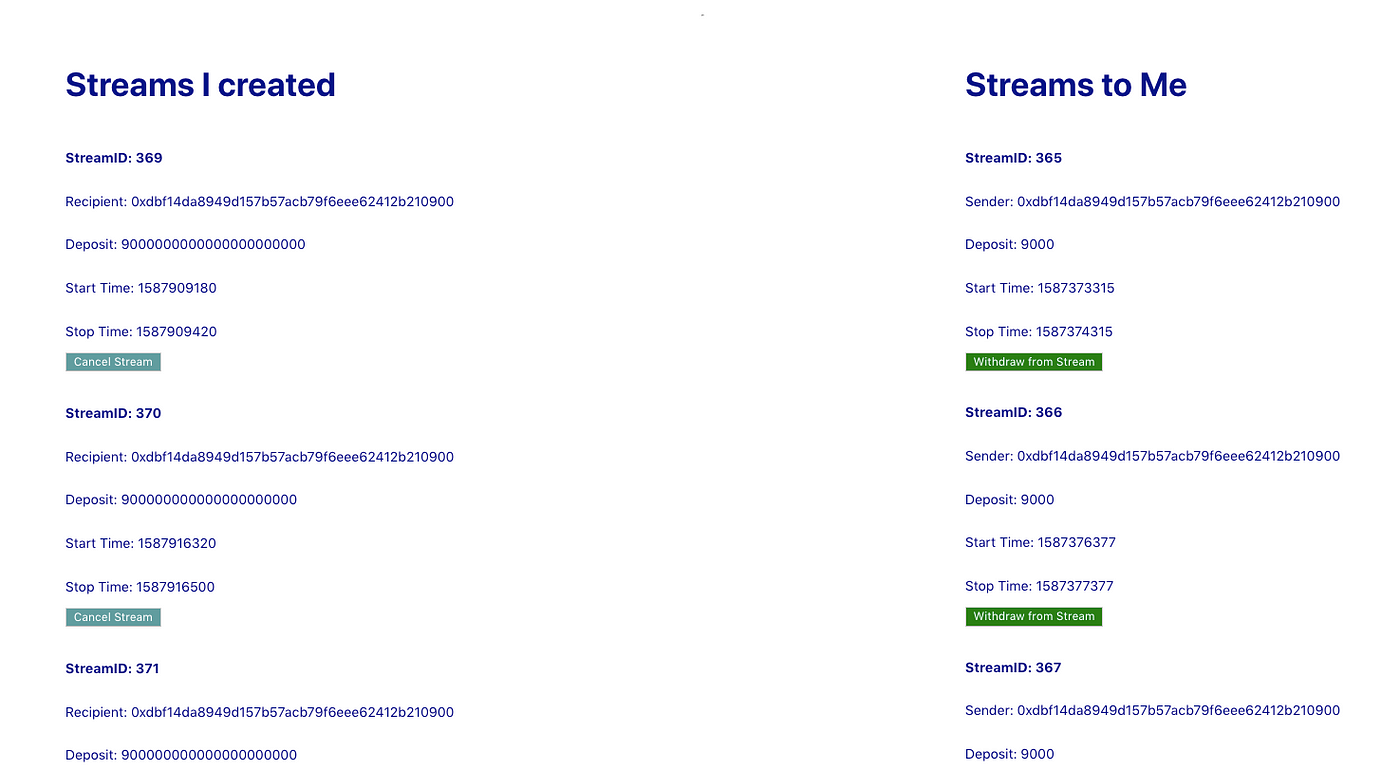
You can call withdraw and cancel like so:
const sablier = new ethers.Contract(
      addresses[chainId].sablier,
      abis.sablier,
      getProviderOrSigner(library, account))
const withdrawTx = await sablier.withdraw(
      stream.id,
      stream.deposit);
Note that withdraw takes streamId and balance You can add an input where the user specifies how much they want to withdraw from the stream. Withdrawing stream.deposit will only work if we’ve passed the stopTime.
const sablier = new ethers.Contract(
      addresses[chainId].sablier,
      abis.sablier,
      getProviderOrSigner(library, account))
const cancelTx = await sablier.cancel(stream.id);
Here is the official documentation that details how each of these functions work.
Congratulations!
You’re now on your way to making a dapp for real-time finance, powered by Sablier. I got a chance to use it for the first time during the DragonQuest hackathon and made a Peer Discovery platform where individuals can go and find mentors, domain experts, consultants, and all kinds of service providers to engage in a 1–1 video chat while streaming money with Sablier. You can check it out at https://peerstream.netlify.app
Sablier is less than a year old, but it is realizing the long-talked-about meme of money streaming. This will unlock many new ways we can interact and engage with online service providers
You can already use Sablier today and there are many things to look forward to in their next release. If you’re a developer who wants to play around with money legos, I hope this tutorial has been helpful. If you found anything confusing or missing please leave a comment.
⚡️ Sablier.me